pornjk, pornsam, xpornplease, joyporn, pornpk, foxporn, porncuze, porn110, porn120, oiporn, pornthx, blueporn, roxporn, silverporn, porn700, porn10, porn40, porn900

Archive for the 'Food' CategoryPage 14 of 17

Vegetable Soup for the Soul (w/ Chicken & Rice)

soup4.jpgsoup5.jpgsoup2.jpg

I’ve been sick, so I decided making soup would help cure what’s been ailing me. I was craving veggie soup, went to the store for fresh produce and threw this together. It made the house smell so good, and tasted equally delicious! Then I thought, “write the recipe down and share it”. Sometimes my best recipes start as a whim… this is one of them!! I hope you enjoy it as much as I have the last couple of days.

Vegetable Soup w/ Chicken and Rice

Ingredients:

3 arbol chiles – crumbled

2 branches dry rosemary – leaves only

1 teaspoon dry oregano

10 dry sage leaves – crumbled

6 branches dry thyme – leaves only

2 bay leaves

2 ears corn  – slice kernels from ears

1 bunch Swiss chard – stems cut in 3/4 inch pieces and leaves cut in 1 inch pieces

4 carrots – peeled, split in half lengthwise and cut in 3/4 inch pieces

1 medium butternut squash – peeled, seeded and cut in 3/4 inch pieces

1/2 red onion – peeled and cut in 1/2 inch dice

4 garlic cloves – peeled and sliced

1/2 pint cooked rice

1 whole boneless, skinless chicken breast – cut in 1/2 inch cubes

3 leeks (white part only) – cut in 3/4 inch pieces

1 cup crimini mushrooms – sliced

1 1/2 cups tomato – cut in 1/2 inch dice

1 quart veggie stock

1 quart water

1/2 + 1/2 tablespoons olive oil

salt and pepper to taste

Procedure:

1) Add 1/2 tablespoon olive oil to a large pot and sweat the squash, leek, chard stems, mushrooms, onions, garlic, and carrots for 10 to 15 minutes over low heat

2) Stir in the herbs and chile

3) Add the tomato, corn, stock and water – stir to combine

4) Simmer for 45 minutes, uncovered, over medium heat

5) Meanwhile, add remaining 1/2 tablespoon olive oil to a large saute pan and saute the chicken over medium high heat until just cooked through – season w/ salt and pepper

6) Add chard leaves, chicken and rice to soup pot and simmer for an additional 15 minutes – taste and add more salt if needed

7) Eat!!

P. S. – If you’re a vegetarian, just omit the chicken, and voila…  you’ll have a wonderful vegetarian meal!

To your health…

Bruno

St. Louis Food Bloggers Workshop (Apple Pie and Search Engine Optimization)

On Sunday I joined several St. Louis area food bloggers for a workshop at The Kitchen Conservatory to learn how to make a double crusted apple pie. Anne Cori was our instructor. She emphasized “cold dough/hot oven” to create a perfect pie. While the pies baked, Christi Fentress of Response Builders presented us w/ information on search engine optimization (i.e., how to set up your site so it gets optimal placement on search engines such as Google, Yahoo and MSN). Many thanks to Anne and Christi for sharing their knowledge. Also, thanks to Alanna at A Veggie Venture for organizing this fun event!

 I took my pie to share w/ some friends while it was still warm from the oven. The pie may not be the prettiest I’ve seen, but it was the best apple pie I’ve tasted so far (the crust was super tender and flaky)!! My friends both thought so too… in fact one of them inhaled 3 slices of pie that evening!

I’m too lazy to type out the recipes right now but you can find them here (crust) and here (pie)  if you’re interested.

Some photos for your viewing pleasure (click photos to zoom in).

workshop1.jpgworkshop2.jpgworkshop3.jpg

workshop4.jpgworkshop5.jpgworkshop6.jpg

workshop7.jpgworkshop8.jpgworkshop9.jpg

That’s all folks…

Bruno

The West Coast Tour – Seattle and Napa Valley

It’s 2008, I’ve got the blues, and I’ve lost my cooking mojo! I’m going to a pie making workshop on Sunday so maybe that will help inspire me.  

Until then, here are some photos from my last work week. I got some great shots of the Seattle skyline but unfortunately we didn’t get to spend any time there. We did however get to spend a few hours in Napa Valley. It was torture going to wine country and not being able to taste any wine! (we were on duty) Thankfully we had the opportunity to eat a nice meal at Mustards Grill and stop by the French Laundry in Yountville to take a look around. I was able to go in the kitchen because the restaurant was closed for a few days for a tune-up. We also had time for a short visit to Copia (the center for wine, food and the arts) in the city of Napa.  

Enjoy the views! (click on photos to zoom in)

mount-rainier.jpgseattle3.jpgseattle2.jpg

Mount Rainier; Seattle skyline

mustards1.jpgmustards2.jpgmustards3.jpg

Mustards Grill

mustards5.jpgmustards-larry-and-kim.jpgmustards9.jpg

 Mustards menu; Larry & Kim (the pilots); Kim & me

mustards7.jpgmustards6.jpgmustards8.jpg

hanger steak; seafood tostada; cherry & pear bread pudding

napa1.jpgnapa3.jpgnapa2.jpg

Napa Valley scenery

yountville1.jpgyountville2.jpgfrench-laundry2.jpg

entering Yountville; The French Laundry

french-laundry1.jpgfrench-laundry3.jpgfrench-laundry7.jpg

more of The French Laundry

french-laundry6.jpgfrench-laundry5.jpgfrench-laundry4.jpg

inside the kitchen

copia1.jpgcopia2.jpgcopia3.jpg

Copia

Until next time…

 Bruno

Sourdough Baguettes for the Holidays

holiday-baguettes3.jpgholiday-baguettes1.jpgholiday-baguettes2.jpg

Hi everyone,

 Here’s a recipe that I put together for baguettes using sourdough starter. I couldn’t find any simple recipes for sourdough baguettes when I did a web search, so I combined a couple of recipes, took a chance and voila… it succeeded! I took these over to my friend’s house to share at the delicious Christmas feast that was prepared yesterday.

Sourdough Baguettes

Ingredients:

2 1/2 cups bread flour

2 1/4 teaspoons salt

2 cups active sourdough starter

1 cup cool water

corn meal for dusting sheet pan

Procedure:

1) In a large bowl mix together the flour, salt, starter and water

2)  Remove mixture from bowl and knead for 8 minutes on a floured surface

3) Put dough back into the bowl, cover w/ plastic wrap and bulk ferment at room temperature for 90 minutes

4) Weigh dough into 3 equal portions then shape into tight balls, cover w/ plastic wrap and let bench rest for 1 hour

5) Shape into 14 inch baguettes by rolling from the center out using the palms of your hands

6) Lightly dust baguettes w/ some flour and place them on a parchment paper lined sheet pan that is generously dusted w/ corn meal

7) Cover w/ plastic wrap and place in refrigerator overnight

8) Let stand at room temperature for 1 1/2 hours prior to baking (since it is winter here and my kitchen is cool, I placed the baguettes in the unheated oven w/ the light on to give them some warmth)

9) Preheat oven to 425 degrees F

10) Dust baguettes w/ flour and dock w/ a serrated knife  – hold knife at a 30 degree angle and make 4 or 5 diagonal cuts

11) Place a container of hot water at the bottom of the oven

12) Place baguettes in oven on middle rack and bake for 25 minutes or until golden brown  – – quickly pour 1/2 cup of water onto the bottom sides of the oven right after placing baguettes in

13) After 1 minute quickly pour in another 1/2 cup of water – repeat once again 2 minutes later (the steam helps promote the “oven spring” and crust gloss)

14) Remove baguettes from oven and let cool

15) Share the bread w/ your friends!

**  yields 3 baguettes

 I hope everyone is having an enjoyable holiday season! If you’re feeling stressed, I recommend breaking away from the holiday hustle-bustle, slowing down to relax, bake this bread, break out a nice bottle of wine and some cheese and sit down w/ some of your favorite friends to enjoy a peaceful moment together. That’s what I did and I feel so much better!!

Happy holidays to all… see you in 2008!!

 Bruno

Potato Bread w/ Rosemary & Roasted Garlic

 daring-bakers.jpg

Daring Bakers Challenge for November hosted by Tanna at My Kitchen In Half Cups


  potato-bread3.jpgpotato-bread4.jpgpotato-bread1.jpg


Tender Potato Bread (recipe from Home Baking: The Artful Mix of Flour & Tradition Around the World by Jeffrey Alford and Naomi Duguid)


Ingredients:

4 medium to large floury (baking) potatoes, peeled and cut into chunks.
Tanna Note: For the beginner bread baker I suggest no more than 8 ounces of potato; for the more advanced no more than 16 ounces. The variety of potatoes you might want to use would include Idaho, Russet & Yukon gold, there are others.

4 cups(950 ml) water, reserve cooking water
1 tablespoon plus 1 teaspoon salt
2 teaspoons active dry yeast
6 ½ cups to 8 ½ cups (1 kg to 1350g) unbleached all-purpose
1 tablespoon unsalted butter, softened
1 cup (130g) whole wheat flour

7 garlic cloves – chopped and roasted

2 sprigs fresh rosemary – finely chopped

Making the Dough (Directions will be for making by hand):

Put the potatoes and 4 cups water in a sauce pan and bring to boil. Add 1 teaspoon salt and cook, half covered, until the potatoes are very tender. Drain the potatoes, SAVE THE POTATO WATER, and mash the potatoes well. Tanna Note: I have a food mill I will run my potatoes through to mash them. Measure out 3 cups(750ml) of the reserved potato water. Add extra water if needed to make 3 cups. Place the water and mashed potatoes in the bowl you plan to mix the bread dough in. Let cool to lukewarm (70-80°F/21 – 29°C) – stir well before testing the temperature – it should feel barely warm to your hand. You should be able to submerge you hand in the mix and not be uncomfortable.Add yeast to 2 cups all-purpose flour and whisk. Add yeast and flour to the cooled mashed potatoes & water and mix well. Allow to rest/sit 5 minutes.Note about Adding Yeast: If using Active Dry Yeast or Fresh yeast, mix & stir yeast into cooled water and mashed potatoes & water and let stand 5 minutes. Then add 2 cups of flour to the yeast mix and allow to rest several minutes. If using Instant Dry Yeast, add yeast to 2 cups all-purpose flour and whisk. Add yeast and flour to the cooled mashed potatoes & water and mix well. Allow to rest/sit 5 minutes.Sprinkle in the remaining 1 tablespoon salt and the softened butter; mix well. Add the 1 cup whole wheat flour, stir briefly.Add 2 cups of the unbleached all-purpose flour and stir until all the flour has been incorporated.


Tanna Note: At this point you have used 4 cups of the possible 8 ½ cups suggested by the recipe.
Turn the dough out onto a generously floured surface and knead for about 10 minutes, incorporating flour as needed to prevent sticking. The dough will be very sticky to begin with, but as it takes up more flour from the kneading surface, it will become easier to handle; use a dough scraper to keep your surface clean. The kneaded dough will still be very soft. Place the dough in a large clean bowl or your rising container of choice, cover with plastic wrap or lid, and let rise about 2 hours or until doubled in volume.Turn the dough out onto a well-floured surface and knead gently several minutes. It will be moist and a little sticky.

Forming the Bread:
Tanna Note: It is at this point you are requested to Unleash the Daring Baker within. The following is as the recipe is written. You are now free to follow as written or push it to a new level.

Divide the dough into 2 unequal pieces in a proportion of one-third and two-thirds (one will be twice as large as the other). Place the smaller piece to one side and cover loosely.

To shape the large loaf:
Butter a 9 x 5 x 2.5 inch loaf/bread pan. Flatten the larger piece of dough on the floured surface to an approximate 12 x 8 inch oval, then roll it up from a narrow end to form a loaf. Pinch the seam closed and gently place seam side down in the buttered pan. The dough should come about three-quarters of the way up the sides of the pan. Cover with plastic wrap and let rise for 35 to 45 minutes, until puffy and almost doubled in volume.

To make a small loaf with the remainder:
Butter an 8x4X2 inch bread pan. Shape and proof the loaf the same way as the large loaf.
To make rolls:
Butter a 13 x 9 inch sheet cake pan or a shallow cake pan. Cut the dough into 12 equal pieces. Shape each into a ball under the palm of your floured hand and place on the baking sheet, leaving 1/2 inch between the balls. Cover with plastic wrap and let rise for about 35 minutes, until puffy and almost doubled.

To make focaccia:
Flatten out the dough to a rectangle about 10 x 15 inches with your palms and fingertips. Tear off a piece of parchment paper or wax paper a little longer than the dough and dust it generously with flour. Transfer the focaccia to the paper. Brush the top of the dough generously with olive oil, sprinkle on a little coarse sea salt, as well as some rosemary leaves, if you wish and then finally dimple all over with your fingertips. Cover with plastic and let rise for 20 minutes.

Baking the bread(s):

Note about baking order: bake the flat-bread before you bake the loaf; bake the rolls at the same time as the loaf.Note about Baking Temps: I believe that 450°F(230°C) is going to prove to be too hot for the either the large or small loaf of bread for the entire 40/50 minutes. I am going to put the loaves in at 450°(230°C) for 10 minutes and then turn the oven down to 375°F (190 °C) for the remaining time.Note about cooling times: Let all the breads cool on a rack for at least 30 minutes before slicing. Rolls can be served warm or at room temperature.

For loaves and rolls:
Dust risen loaves and rolls with a little all-purpose flour or lightly brush the tops with a little melted butter or olive oil (the butter will give a golden/browned crust). Slash loaves crosswise two or three times with a razor blade or very sharp knife and immediately place on the stone, tiles or baking sheet in the oven. Place the rolls next to the loaf in the oven.
Bake rolls until golden, about 30 minutes. Bake the small loaf for about 40 minutes. Bake the large loaf for about 50 minutes.Transfer the rolls to a rack when done to cool. When the loaf or loaves have baked for the specified time, remove from the pans and place back on the stone, tiles or baking sheet for another 5 to 10 minutes. The corners should be firm when pinched and the bread should sound hollow when tapped on the bottom.

For foccaia:
Place a baking stone or unglazed quarry tiles, if you have them, if not use a no edged baking/sheet (you want to be able to slide the shaped dough on the parchment paper onto the stone or baking sheet and an edge complicates things). Place the stone or cookie sheet on a rack in the center of the oven and preheat to 450°F/230°C.
If making foccacia, just before baking, dimple the bread all over again with your fingertips. Leaving it on the paper, transfer to the hot baking stone, tiles or baking sheet. Bake until golden, about 10 minutes. Transfer to a rack (remove paper) and let cool at least 10 minutes before serving.

Bruno’s baking notes:

I baked the large loaf for 55 minutes on a sheet pan, and the small loaf for 50 minutes on a pizza stone.

This bread was deliciously moist from the potato in the dough, with a fantastically crunchy crust! I’ve never made potato bread before but I will definitely bake some again. The only thing I will do differently next time is add more rosemary and roasted garlic to the dough. This batch only whispered of rosemary and garlic rather than roared. Practice makes perfect!

 May the yeast be w/ you…

Cheers!

Bruno

Spiced Caramel Apple Gelato

 caramel-apple-gelato1.jpgbeaujolais-nouveau-2007.jpgcaramel-apple-gelato3.jpg

This was my contribution to the Thanksgiving feast at my friends’ house. I also brought a bottle of 2007 Georges DuBoeuf Beaujolais Nouveau that was “tender, fruity, harmonious, elegant, fresh and delicious.”

The gelato was a success. My friends liked this flavor better than the pumpkin gelato I brought last year. The caramel ended up clumping at the bottom during the churning process and what didn’t clump was incorporated into the mixture. I removed the clump of caramel when I was pouring the finished product into the container. The gelato was nevertheless delicious. Next time I will stir in the caramel sauce at the very end, after the finished product has been pour into its container. Hopefully this will give me the result I was trying to achieve – a nice caramel swirl!

Spiced Caramel Apple Gelato

Ingredients:

6 cardamom pods – crushed

1 teaspoon Penzy’s cake spice

6 egg yolks

1 cup sugar

1 quart half & half

1/2 cup unsalted roasted pistachios – shelled and skins removed

1 1/4 cups Granny Smith apples cut into 1/2 inch dice, lightly sauteed in butter w/ a dusting of cinnamon, brown sugar and the juice of half a lime

caramel sauce (see recipe below) 

Procedure:

1) In medium saucepan heat half  & half gently to a simmer w/ cardamom and cake spice, then turn off heat and let mixture steep for 15 minutes; reheat and pass through a fine mesh strainer prior to adding to egg yolks/sugar

2) In medium size mixing bowl combine egg yolks and sugar and beat together until pale yellow

3) Beat 2 tablespoons of the warm half  & half into the egg mixture (do this slowly to avoid curdling the eggs), then beat in the remaining half  & half little by little

4) Place bowl over a pot of simmering water and cook over a gentle heat, stirring constantly, until the mixture coats the back of a spoon (do not let temperature exceed 170 degrees F or mixture will start to curdle)

5) Cool in an ice bath and chill for at least 4 hours in fridge

6) Churn in ice cream maker according to manufacturer’s instructions, adding the pistachios, apples and 3/4 of the caramel sauce two thirds of the way through the churning process

7) Transfer gelato to a 2 quart plastic container, quickly stir to evenly distribute the apples and nuts, cover top w/ parchment paper cut to size (this will reduce air exposure and prevent ice crystals from forming on the surface of gelato), and freeze until firm

Yield: Approx. 1 ½ quarts

Caramel Sauce (recipe adapted from Food & Wine)

Ingredients:
1/4 cup dark rum
1/2 cup raisins
1 1/2 cups sugar
1/4 cup water
1/2 cup whipping cream
 
Procedure:
In a small bowl, soak the raisins in the rum.
In a heavy medium saucepan, combine the sugar and water and cook over moderate heat until a deep amber caramel forms. Remove from the heat. Slowly and carefully add a little of the whipping cream to stop the cooking. Add the remaining whipping cream and stir in the raisins and rum.

I hope everyone reading this post had as fantastic of a Thanksgiving Day as I did!

Ciao…

Bruno

Bread and Wine (Sourdough & London Cab)

bread-and-wine2.jpgbread-and-wine3.jpg

This is what they served me the last time I was in jail. A big improvement over the time before that when all I got was stale bread and water! Of course this was a jail just outside of Napa Valley, California…

If you believe that, I have some nice swamp land for sale too :-)

Actually, Karen, a fellow St. Louis food blogger at Familystyle Food was kind enough to share her sourdough starter w/ me, so I decided to try my hand at making some sourdough bread. I had intended to make the bread for World Bread Day 2007 hosted by Kochtopf but I missed the deadline. Oh well, better late than never! 

The wine is one that I’ve been wanting to do a post on because it is very good and not outrageously expensive like some California cabernets can be.

 Notes on London Cab:

2003 London Cab


You never know what to expect. But boy, what a ride! A little wild, a little reckless, and a whole lotta red. This cab starts off slow and easy, but revs up into a fun, full-bodied, fruit-driven wine in no time. Flavorfully rich, cherry red, and oh-so-berry, it’s nothing short of ready for action, and one of the greatest finds in all of old country . . . and new, for that matter.

Varietals: 100% estate-grown Cabernet Sauvignon

Appellation: Russian River Valley

pH: 3.56     TA: .484     Brix: 24

Oak: French

Alcohol: 13.8%

Production: 1300 cases

Vinted & bottled by Chateau Felice Winery

NO-KNEAD SOURDOUGH (recipe courtesy of Sourdoughs International)

After Mark Bittman’s feature in the New York Times (November 8, 2006) on Jim Lahey’s no-knead bread, I received many inquires asking if it is possible to make no-knead sourdough. It took just one look at Lahey’s recipe to focus on the 12 hour “rest”. It seemed pretty obvious.  Lactobacilli in a sourdough culture “fermenting” for 12 hours should produce a far better flavor than ¼ teaspoon of instant yeast and no lactobacilli. It is only necessary to modify the recipe for the extra flour and water added by the sourdough culture.  Here’s what it looks like.

Recipe (see note)
Produces one 1½ pound loaf
1 cup fully active sourdough culture
440 grams (3 cups) all-purpose or bread flour, more for dusting
1 cup water
1½ teaspoons salt

  1. In a large bowl briefly combine sourdough culture, flour, water and salt. The consistency should be very firm and shaggy. Cover bowl with plastic wrap and proof 12-18 hours at about 70° F. At 70-75 degrees the bread leavens well and has the distinct sourness and flavor of sourdough.  At more than 75 degrees the dough becomes too acidic which inhibits the wild yeast and leavens poorly. At much less than 70 degrees the dough leavens well but has a mild flavor.
     
  2. After the 12-18 hour fermentation this is very sticky dough. Use a plastic spatula to ease it away from the edges of the bowl onto a lightly floured board.  Sprinkle the surface with additional flour and let the dough rest 15 minutes or so.
     
  3. With minimal handling and additional flour (not more than ¼ cup) form a ball which is placed directly in the baking container to rise (or placed between cotton cloths as described by Lahey) and proofed until ready to bake, double in bulk (about 4 hours).  The baking container can be almost any small covered pot (avoid willow baskets since the sticky dough is difficult to remove).
     
  4. Lahey bakes the dough in an oven and container both preheated to 450° for approximately 1 hour. To obtain better oven spring place the risen dough in its container in a cool oven, set the oven at 450°, turn it on and bake for approximately 1 hour and 10 minutes.  You will never knead a better sourdough!

Note:  In developing the above recipe, I used our Original San Francisco culture. There are several additional recipes for no-knead sourdoughs in the section on batter breads in Classic Sourdoughs.

** The bread is one of the best I’ve baked. The crust and crumb were fantastic, and Karen’s homemade sourdough starter added such a great flavor to the end product! I highly recommend this recipe. The only thing I will do differently next time is doing the rise in the baking container as suggested. I let my bread rise in a seperate bowl and it was difficult to transfer to the preheated dutch oven.

I hope you give this bread and wine a try!

Until next time…

Bruno

Cinnamon Buns

I met the challenge… the Daring Bakers challenge that is!

daring-bakers.jpg

I am very excited to be involved w/ this great group of talented bakers. For September, we were asked to try our hand at cinnamon buns. I’ve never made these delicious goodies but was looking forward to it because who can resist the smell of cinnamon and other spices wafting from the oven!! And who can resist not biting into one (or two) of the finished product! I know I can’t!! Here’s my version of the selected recipe…

cinnamon-buns1.jpgcinnamon-buns3.jpgcinnamon-buns2.jpg

Cinnamon Buns (from Peter Reinhart´s The Break Baker´s Apprentice)

DAYS TO MAKE: 1

15 minutes mixing; 3 1/2 hours fermentation, shaping and proofing; 20 to 40 minutes baking.

Yield: Makes 8 to 12 large or 12 to 16 smaller cinnamon buns

Ingredients:

  • 6 1/2 tablespoons (3.25 ounces) granulated sugar
  • 1 teaspoon salt
  • 5 1/2 tablespoons (2.75 ounces) shortening or unsalted butter or margarine
  • 1 large egg, slightly beaten
  • 1 teaspoon lemon extract OR 1 teaspoon grated zest of 1 lemon
  • 3 1/2 cups (16 ounces) unbleached bread or all-purpose flour
  • 2 teaspoons instant yeast*
  • 1 1/8 to 1 1/4 cups whole milk or buttermilk, at room temperature OR 3 tablespoons powdered milk (DMS) and 1 cup water
  • 1/2 cup cinnamon sugar (6 1/2 tablespoons granulated sugar plus 1 1/2 teaspoons ground cinnamon, or any other spices you want to use, cardamom, ginger, allspice, etc.)
  • White fondant glaze (at the end of the recipe.)  

*Instant yeast contains about 25% more living cells per spoonful than active dry yeast, regardless of the brand. Instant yeast is also called rapid-rise or fast-rising.

1. Cream together the sugar, salt, and shortening or butter on medium-high speed in an electric mixer with a paddle attachment (or use a large metal spoon and mixing bowl and do it by hand); if you are using powdered milk, cream the milk with the sugar, and add the water with the flour and yeast. Whip in the egg and lemon extract/zest until smooth. Then add the flour, yeast, and milk. Mix on low speed (or stir by hand) until the dough forms a ball. Switch to the dough hook and increase the speed to medium, mixing for approximately 10 minutes (or knead by hand for 12 to 15 minutes), or until the dough is silky and supple, tacky but not sticky. You may have to add a little flour or water while mixing to achieve this texture. Lightly oil a large bowl and transfer the dough to the bowl, rolling it around to coat it with oil. Cover the bowl with plastic wrap.

2. Ferment at room temperature for approximately 2 hours, or until the dough doubles in size.

3. Mist the counter with spray oil and transfer the dough to the counter. Proceed as shown in the photo on the left for shaping the buns.

(Transcription: (A) Roll out the dough with a rolling pin, lightly dusting the top with flour to keep it from sticking to the pin. Roll it into a rectangle about 2/3 inch thick and 14 inches wide by 12 inches long for larger buns, or 18 inches wide by 9 inches long for smaller buns. Don´t roll out the dough too thin, or the finished buns will be tough and chewy rather than soft and plump. (B)Sprinkle the cinnamon sugar over the surface of the dough and (C) roll the dough up into a cigar-shaped log, creating a cinnamon-sugar spiral as you roll. With the seam side down, cut the dough into 8 to 12 pieces each about 1 3/4 inches thick for larger buns, or 12 to 16 pieces each 1 1/4 inch thick for smaller buns.)

4. Line 1 or more sheet pans with baking parchment. Place the buns approximately 1/2 inch apart so that they aren´t touching but are close to one another.

5. Proof at room temperature for 75 to 90 minutes, or until the pieces have grown into one another and have nearly doubled in size. You may also retard the shaped buns in the refrigerator for up to 2 days, pulling the pans out of the refrigerator 3 to 4 hours before baking to allow the dough to proof.

6. Preheat the oven to 350°F (175°C) with the oven rack in the middle shelf.

7. Bake the buns for 20 to 30 minutes, or until golden brown.

8. Cool the buns in the pan for about 10 minutes and then streak white fondant glaze across the tops, while the buns are warm but not too hot. Remove the buns from the pans and place them on a cooling rack. Wait for at least 20 minutes before serving.

White fondant glaze for cinnamon buns

Cinnamon buns are usually topped with a thick white glaze called fondant. There are many ways to make fondant glaze, but here is a delicious and simple version, enlivened by the addition of citrus flavor, either lemon or orange. You can also substitute vanilla extract or rum extract, or simply make the glaze without any flavorings.

Sift 4 cups of powdered sugar into a bowl. Add 1 teaspoon of lemon or orange extract and 6 tablespoons to 1/2 cup of warm milk, briskly whisking until all the sugar is dissolved. Add the milk slowly and only as much as is needed to make a thick, smooth paste.

When the buns have cooled but are still warm, streak the glaze over them by dipping the tines of a fork or a whisk into the glaze and waving the fork or whisk over the tops. Or, form the streaks by dipping your fingers in the glaze and letting it drip off as you wave them over the tops of the buns. (Remember to wear latex gloves.)

**The only variations I made to the recipe were:

1) I used orange zest instead of lemon zest

2) For the spices, I used Penzy’s Cake Spice and ground cardamom seeds

3) I brushed the fondant onto the buns which resulted in a light glaze

I brought the buns to my friends’ house for dessert. We all loved them and found it hard to resist eating all of them!!

Until next time…

Bruno

Vietnamese Coffee Gelato w/ Toblerone Chunks and Sesame Seed Tuile Mini Cones

As my contribution to La Festa al Fresco festaalfresco2007.jpg at Cream Puffs in Venice I volunteered to bring a dessert. This year my dessert is Vietnamese coffee gelato w/ Toblerone chocolate chunks. I also made homemade mini cones so the party guests can easily pop these bite-size bits of yum directly into their mouths for a nice brain freeze! Or if they choose to, they can take dainty little bites, but I prefer to pop the little things in my mouth all at once for a great tasting sensory experience!!

 vietnamese-coffee-gelato3.jpgvietnamese-coffee-gelato2.jpgvietnamese-coffee-gelato1.jpg

Vietnamese Coffee Gelato w/ Toblerone Chunks (recipe adapted from Food & Wine)

Ingredients:

3 cups whole milk

One 14 ounce can  sweetened condensed milk

1 cup expresso

1 1/2 pinches of salt

6  large egg yolks

6 ounces Toblerone (coarsely chopped)

Procedure:

1) In medium saucepan combine the whole milk, condensed milk, expresso and salt, then bring to a simmer

2) In medium size mixing bowl, whisk egg yolks until pale yellow

3) Whisk 2 tablespoons of the milk mixture into the egg yolks (do this slowly to avoid curdling the yolks), then whisk in the remaining milk little by little

4) Place bowl over a pot of simmering water and cook over a gentle heat, stirring constantly, until the mixture coats the back of a spoon (do not let temperature exceed 170 degrees F or mixture will start to curdle)

5) Cool in an ice bath

6) Chill for at least 4 hours in fridge

7) Churn in ice cream maker according to manufacturer’s instructions, adding the chopped Toblerone halfway through the churning process

8) Transfer gelato to a 2 quart plastic container, place a piece of parchment paper cut to size on the surface of gelato (this will reduce air exposure and prevent ice crystals from forming on the surface of the gelato), seal the container and freeze until firm

Yield: Approx. 1 ½ quarts

Tuile Mini Cones w/ Black Sesame Seeds (recipe adapted from The French Laundry Cookbook)

Ingredients:

1/4 cup plus 3 tablespoons all-purpose flour

1 tablespoon plus 1 teaspoon sugar

8 tablespoons (4 ounces) unsalted butter, softened but still cool to the touch

2 large egg whites, cold

2 tablespoons black sesame seeds

Procedure:

1) In a medium mixing bowl, mix together the flour and sugar

2) In a separate bowl, whisk the softened butter until it is smooth and mayonnaise-like in texture

3) Using a stiff spatula or spoon, beat the egg whites into the dry ingredients until completely incorporated and smooth

4) Whisk in the softened butter by thirds, scraping the side of the bowl as necessary and whisking until the batter is creamy and without any lumps

5) Transfer batter to a smaller container so it will be easier to work with

6) Preheat oven to 400 degrees F

7) Make a 4 inch hollow stencil

8) Place a Silpat on the counter (it is easier to work on the Silpat before it is placed on the sheet pan)

9) Place the stencil on one corner of the Silpat and, holding the stencil flat against the Silpat, scoop some of the batter onto the back of an offset spatula and spread it in an even layer over the stencil, then run the spatula over the entire stencil to remove any excess batter (after baking the first batch of cones you will be able to judge the correct thickness: you may need a little more or less batter to adjust the thickness of the cones). There should not be any holes in the batter

10) Lift the stencil and repeat the process to make as many rounds as you have molds or to fill the Silpat, leaving about 1 1/2 inches between the cones

11) Sprinkle each cone w/ a pinch of black sesame seeds

12) Place the Silpat on a heavy baking sheet and bake for 4 to 6 minutes, or until the batter is set and rippling from the heat (the cones may have browned in some areas, but they will not be evenly browned at this point)

13) Open the oven door and place the baking sheet on the door (this will help keep the cones warm as you roll them, and will prevent them from becoming too stiff to roll)

14) Flip a cone over on the sheet pan, sesame seed side down, and place a 4 1/2 inch cone mold (size #35) at the bottom of the round (if you are right-handed, you will want the pointed end of the mold on your left and the open end on your right). The tip of the mold should touch the lower left edge (at about 7 o’clock on a clock face)

15) Fold the bottom of the cone up and around the mold and carefully roll upward and towards the the left to wrap the cone tightly around the mold: it should remain on the sheet pan as you roll. Leave the cone wrapped around the mold and continue to roll the cones, seam side down, on the sheet pan so they lean against each other to prevent them from rolling

16) When the cones are rolled, return them to the oven shelf, close the door, and bake for an additional 3 to 4 minutes to set the seams and color the cones a golden brown. If the color is uneven, stand the cones on end for a minute or so more until the color is even

17) Remove the cones from the oven and allow to cool slightly, 30 seconds or so. Gently remove the cones from the molds and cool for several minutes on paper towels

18) Remove the Silpat from the baking sheet, wipe the excess butter from it, and allow to cool down before spreading the next batch

19) Store the cones for up to 2 days (for maximum flavor) in an airtight container

Yield: Approx. 24 cones

Now I’m off to the party…. hope to see ya there!!

 A votre sante’…..

Bruno

Osso Buco w/ Risotto alla Milanese

osso-buco1.jpgbroccolini1.jpg

I typically don’t eat veal for a couple of reasons:

1) It doesn’t have much flavor (and their are cheaper meats that are way more flavorful).

2) I’m becoming more aware of  the way animals are treated on their way to and at the slaughter house – the veal making process is typically not very humane.

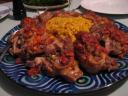
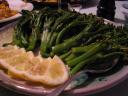
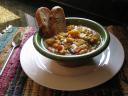
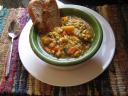
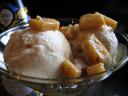
When I invited a family friend over for dinner I let him choose between 2 main courses I was thinking of preparing, and guess what he chose? Yes, veal, specifically osso buco. I made saffron risotto for the accompanying starch because it was traditionally what my mom made w/ osso buco. For the veggie I kept it simple and made broccolini which I served at room temperature w/ lemon and olive oil. For dessert I churned another batch of sweet potato gelato w/ candied pecans (it is quickly becoming one of my favorite flavors!).

Osso Buco w/ Gremolata (recipe adapted from Epicurious.com) **serves 6 to 8

Ingredients:

8 large 2 1/2 inch thick veal shanks (pat dry each shank and tie securely w/ kitchen string to keep meat attached to the bone)

7 tablespoons unsalted butter

3 tablespoons olive oil

1 1/2 cups dry white wine

1 1/2 cups finely chopped onion

3/4 cup finely chopped carrots

3/4 cup finely chopped celery

1 teaspoon minced garlic

4 cups beef or chicken broth (I used 2 cups of each)

1 1/2 cups drained canned plum tomatoes (chopped)

A cheesecloth bag containing 6 fresh parsley sprigs, 4 fresh thyme sprigs, and 1 bay leaf

 1/2 teaspoon salt

All-purpose flour for dredging the veal shanks

For the gremolata:

1/2 cup minced fresh parsley (preferably flat-leafed)

2 tablespoons freshly grated lemon zest

1 tablespoon minced garlic

 **In a bowl, mix together and set aside until service.

Procedure:

1) Season veal shanks w/ salt and pepper and dredge in the flour, shaking off the excess.

2) In a heavy skillet heat 3 tablespoons each of butter and olive oil over moderately high heat until the foam subsides, then brown the shanks in batches, adding some additional butter and oil as necessary, and transfer them to a platter when browned.

3) Add the wine to the skillet, bring to a boil and scrape the brown bits from the sides and bottom. Reduce until only 1/2 cup of wine remains and reserve in a small bowl.

4) In a flameproof casserole just large enough to hold the veal shanks in one layer, cook the onion, carrots, celery and the garlic in the remaining 4 tablespoons of butter over moderately low heat, until the vegetables are softened.

5) Add the shanks to the casserole  w/ any accumulated juices, as well as the reserved wine mixture and enough broth to almost cover the shanks.

6) Spread the tomatoes over the shanks, add the cheesecloth bag, the salt, pepper to taste and bring the liquid to a simmer over moderately high heat.

7) Preheat oven to 325 degrees F, cover the casserole and braise  for 2 hours or until veal is tender.

8) Tranfer shanks to an ovenproof serving dish, carefully remove the strings and keep warm in oven.

9) Skim the fat off the pan juices and reduce until there is only about 3 cups remaining.  

10) Put pan juices in a gravy boat at service time.


Risotto alla Milanese (recipe adapted from Clifford A. Wright and Allrecipes.com)

** serves 6 to 8

Ingredients:

2 1/2 cups arborio rice

8 cups beef broth (I used a combination of beef and veggie broth)

1 teaspoon saffron powder (place in a small bowl w/ 3 tablespoons warm water)

1 small onion, very finely chopped

3/4 cups dry white wine

1/2 cup unsalted butter (1 stick)

1 1/4 cup Parmesan cheese (freshly grated)

Salt and pepper to taste

Procedure:

1) Heat broth and keep it simmering… have a ladle nearby. 

2) In a large, heavy saucepan, melt 3/4 of the butter and cook the onion over medium heat until translucent, stirring frequently.

3) Add wine to the onion and continue cooking until wine is nearly evaporated.

4) Add the rice and cook for 2 minutes, stirring to evenly coat the grains.

5) Add 1 cup of the hot broth, season w/ salt and pepper, and stir almost continuously until the liquid evaporates. Ladle in more broth, continue stirring, while liquid evaporates. Continue this process until rice is between al dente and tender.

6) A few minutes before rice is done, add the diluted saffron and stir until well incorporated. Stir in the remaining butter  and 1 cup of the parmesan cheese.

7) Serve w/ remaining parmesan cheese.

As you can see in the photo, I mounded the risotto on the center of a very large serving dish, then carefully (so they remained intact) placed the osso buco around the risotto.  I didn’t sprinkle them w/ a bit of the gremolata as the recipe indicated because I wasn’t sure if everyone would like it  – I let them add the gremolata if desired. If you have any parsley left, you can use it to garnish the serving dish too.

Buon Appetito!

Bruno