pornjk, pornsam, xpornplease, joyporn, pornpk, foxporn, porncuze, porn110, porn120, oiporn, pornthx, blueporn, roxporn, silverporn, porn700, porn10, porn40, porn900

Archive for the 'Food' CategoryPage 15 of 17

Les Baguettes w/ Chives

baguettes1.jpgbaguettes2.jpgbaguettes3.jpg

Zorra over at Kochtopf invited me to participate in breadbakingday, which is on July 1st. The requirements are to bake some bread w/ herbs in it, preferably fresh herbs from your garden.

breadbakingday.jpg

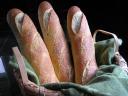
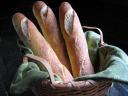
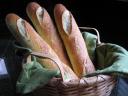
I’ve been wanting to try my hand at making a type of bread that I haven’t made before (or made years ago). I decided to make baguettes because I love their crunchy and chewy textures. To meet the requirement of fresh herbs I cut the fresh chives in my yard that were just sitting there doing nothing. I love the flavor of chives and figured they would add a nice zing to the bread!

This recipe is adapted from the California Culinary Academy’s baguette recipe. It’s simple, but is time consuming, so start the day before you plan on serving the bread.

Ingredients:

1  1/4 teaspoons active dry yeast

1/4 cup very warm water

4 cups bread flour

2  1/4 teaspoons salt

1  1/4 cups cool water

1/4 cup  fresh chives (finely chopped)

Corn meal for dusting sheet pan

Procedure:

1) In a large bowl dissolve the yeast in the warm water and let stand for 3 minutes

2) Add  the flour, salt, chives and cool water to the bowl, mix together w/ your hand, then remove mixture from bowl and knead for 8 minutes

3) Put dough back into the bowl, cover w/ plastic wrap and bulk ferment at room temperature for 90 minutes

4) Weigh dough into 3 equal portions then shape into tight balls, cover w/ plastic wrap and let bench rest for 1 hour

5) Shape into 14 inch baguettes by rolling from the center out using the palms of your hands

6) Place baguettes on a parchment paper lined sheet pan that is lightly dusted w/ corn meal

7) Cover w/ plastic wrap and place in refrigerator overnight

8) Let stand at room temperature for 1 hour prior to baking

9) Preheat oven to 425 degrees F

10) Dock baguettes w/ a very sharp knife or razor  – hold knife at a 30 degree angle and make 3 or 4 diagonal cuts

11) Place a pan of hot water at the bottom of the oven

12) Place baguettes in oven on middle rack and bake for 25 minutes – – quickly pour 1/2 cup of water onto the bottom sides of the oven right after placing baguettes in

13) After 1 minute quickly pour in another 1/2 cup of water – repeat once again 2 minutes later (the steam helps promote the “oven spring” and crust gloss)

14) Remove baguettes from oven and let cool

15) Share the bread w/ your friends!

**  yields 3 baguettes

I was happy w/ the end product except for many of my cuts not opening up on the baguettes while they baked. Next time I will experiment w/ the angle and depth of the cuts as I’m docking the bread.

Happy Bread Baking Day!!

Bruno

Chicken Satay w/ Coconut Curry Sauce

chix-satay2.jpgchix-satay1.jpg

I love the combination of curry and coconut milk. I also love this time of year because outdoor grilling is back in season and grilling imparts such a great flavor to whatever is cooking! A friend recently had a late afternoon pot luck party. I wanted to make something simple, unusual, flavorful, could be served hot or at room temperature, and was grilled. Satay popped into my mind. They cover all  of the above criteria, plus they’re fun to eat!! Here’s the recipe:

Ingredients:

1 tablespoon lemon grass (minced)

1 can coconut milk (14 ounces)

1 tablespoon garlic (minced)

1 tablespoon fresh ginger (minced)

1 teaspoon lime zest   (grated w/ microplane)

juice from 1 lime

1 teaspoon green curry paste

salt and pepper to taste

2  1/2 pounds boneless/skinless chicken breasts

24 bamboo skewers (10 inch size)

charcoal for grill

Procedure:

1) Soak skewers for 1 hour

2) For marinade, place first 8 ingredients in a 13″ x 8″ pyrex dish, heat on stove briefly to meld flavors and dissolve curry paste, then let cool

3) Slice chicken lengthwise into 1/4 inch wide pieces

4) Thread chicken onto skewers and place in marinade, cover and refrigerate for 2 hours

6) Remove chicken skewers from marinade and reserve marinade for sauce

7) Prepare grill

8) On stove, heat marinade  over medium heat for 5 minutes

9) Grill chicken skewers for approx. 2 minutes on each side

10) EAT (my favorite part)

** yields 24 skewers and approx. 1 cup of sauce

This dish is quick and easy to prepare once all the prep work is done. I hope you enjoy it as much as we did! 

A votre sante’….

Bruno

Ferry Plaza Farmers Market – San Francisco

I was in San Francisco recently and was fortunate enough to have time to stop by the farmers market. It was an incredibly beautiful day so I took many photos (I was thinking blog post, blog post!). Let me share a few of my favorites w/ you:

ferry-plaza.jpgferry-plaza17.jpg

ferry-plaza3.jpgferry-plaza1.jpg

ferry-plaza18.jpgferry-plaza19.jpg Lovely and fragrant, fresh cut lavender

ferry-plaza4.jpgferry-plaza5.jpg Tierra Vegetables – this is where I get my pepper jam (they specialize in chile peppers)

ferry-plaza7.jpgferry-plaza8.jpgWe bought some of the best fresh feta cheese I’ve ever tasted – I can’t remember the vendor’s name but he’s always in the booth that’s next to the guy who sells baba ghanoush

ferry-plaza9.jpgferry-plaza10.jpgMy brother-in-law buying some bread at Acme Bread Co. and posing w/ “the goods”

ferry-plaza11.jpgferry-plaza12.jpgBeautiful mushrooms

ferry-plaza13.jpgferry-plaza14.jpg

ferry-plaza15.jpgferry-plaza16.jpgCowgirl Creamery – they make awesome cheeses – one of my favorites is “Pierce Point” which has a rind coated in local dried herbs (unfortunately this cheese is only sold in the fall so I couldn’t buy any…bummer!)

The End…

Hope you enjoyed my quick tour of this fabulous market!

P.S. – Sam at Beck’s & Posh recently did a post which surprisingly discovered that some items are cheaper at the farmers market than at Safeway (the large grocery chain in California)… so support your local farmers, the planet and sustainable agriculture!

P.P.S. – I just found this great farmers market icon – “Blush the Sweet Tomato” at A Veggie Venture. a-veggie-ventures-farmers-market-icon-blush-the-tomato.gif Alanna invites bloggers to use the icon on posts to signify farmers market fresh veggies. Thanks Alanna!

Bruno

under construction

brunosdream is still being built…. please bear w/ me through these growing pains!

Chocolate and Wine Pairing

Myself and several other local food bloggers were invited to attend what I thought was a tasting of different chocolates and wines. Well it turned out to be a lot more than chocolate that was paired w/ the wines as you will see!

This was put together by Holly Cunningham of Hollyberry Baking Co. and Anthony Bommarito of A. Bommarito Wines of St. Louis. Holly prepared a sampling of her specialty desserts that have a local flair to go w/ Anthony’s selection of wines.

Hollyberry_1 We first sampled “Lemon Heaven”, “Lemon Poppy Seed” and “Oatmeal Crannie” paired w/ Saracco Moscato d’Asti 2005 Sparkling Wine. This bubbly was a great match for these lighter, citrusy desserts.

Hollyberry_3 Secondly we had “Cocoa Bliss” and “Marble Fudge Brownies” paired w/ O”Brien Seduction 2004 Cabernet-Merlot Blend Napa Valley, California. This was an enjoyable twist on a classic pairing. The wine was fruit forward w/ velvety tannins. It matched up very well w/ these chocolaty treats.

Hollyberry_2 The last pairing consisted of  “Hollyberry Gooey Butter Cake” and “Holly Dolly Dessert Bars” w/ Chateau Doisy-Vedrines 2003 Sauternes, France. This gooey butter cake is super sweet and rich. I was amazed at how well the Sauternes blended w/ the flavors of this St. Louis favorite!

Hollyberry Baking has packaged these combinations in beautiful gift boxes. If you’re interested go to their website for more information.

Ciao…

Bruno

Stuffed Peppadew Peppers

Peppadews3

This is a hectic time of year and the last thing someone needs is to be stressing over cooking, which I typically find therapeutic rather than stressful. Here’s a quick and easy appetizer recipe so you don’t have to go somewhere empty-handed if you promised to make something but ran out of time to do a more complex recipe (as I did). I got this idea from Barbara at Winos and Foodies. I just added some green (i.e., chives) to make the peppadews more Christmasy. Despite their simplicity, these little guys make a good impression and nice presentation!

Peppadew Peppers Stuffed w/ Feta, Cream Cheese and Chives

Ingredients:

6 ounces feta cheese (crumbled)

8 ounces whipped cream cheese

1/3 cup chopped fresh chives

42 peppadew peppers (I found mine at the grocery store’s olive bar)

Procedure:

Combine first 3 ingredients then stuff peppers

** I used the tip of a butter knife to stuff the peppers, however a friend who liked this recipe said they are going to use a pastry bag to insert the filling. A great idea which I will use next time because filling the peppers was the most time consuming part of this recipe.

***You will have some leftover filling which you can use as a spread on crostini or crackers, a dip for veggies, a sandwich spread, or you can buy more peppadews to fill.

Happy Holidays to all and to all a good night!!

Bruno

Spicy Shrimp on Daikon Chips w/ Roasted Garlic and Chile Aioli

Spicy_shrimp6

Here’s an idea for something non-traditional to bring to your friends’ house or to serve to friends if they’re coming to your house on Thanksgiving Day. I brought these to a friend’s house last week and they disappeared pretty quick! The coolness of the daikon tames the heat of the spicy shrimp. You can prepare this recipe several hours ahead, wrap and place in the fridge until time to serve. Garnish w/ cilantro leaf just before serving.

Spicy Shrimp on Daikon Chips w/ Roasted Garlic and Chile Aioli (makes 24 pieces)

Ingredients:

24 medium shrimp

1 daikon

1 bunch cilantro

1 tablespoon olive oil

1 tablespoon sriracha hot chili sauce

Salt to taste

** Ingredients for mayonnaise (from your favorite recipe)

for aioli:

3 large cloves of garlic

1/2 teaspoon finely ground mulato chile

Procedure:

1) Peel and devein shrimp

2) In a medium bowl, mix sriracha sauce and olive oil, then add shrimp, stir to coat, cover and let marinate in fridge for 1 hour

3) While shrimp are marinating, peel daikon, then using a mandoline, slice daikon into 1/8 inch thick strips

4) Using a cookie cutter, cut daikon into 1 3/4 inch rounds

5) Place daikon “chips” into a bowl of cold water to maintain crispness

6) Remove shrimp from fridge

7) Saute’ shrimp over medium heat for approximately 4 minutes or until shrimp becomes pink and opaque, salt to taste

8) Set shrimp aside to cool

9) While shrimp are cooling, make mayonnaise using your favorite recipe

10) Peel and mince garlic, then saute’ in olive oil until light brown and let cool

11) Using a whip, blend garlic and chile powder into mayonnaise

12) Remove daikon from water and pat dry w/ a kitchen towel

13) Top each daikon chip w/ 1/2 teaspoon of aioli, then top w/ shrimp

14) Garnish w/ a cilantro leaf

15) Place on serving tray

16) MUNCH!

Cheers and have a Happy Thanksgiving everyone!!

Bruno

Twisted Oat Raisin Bread

After originally doing this post, Ivonne at Cream Puffs in Venice suggested I submit this recipe for World Bread Day. World Bread Day is on October 16th and is being hosted by Zorra of Kochtopf.

World_bread_day

In order to meet the requirements for Bread Day I had to bake some bread (done!) and share some of my personal preferences for bread. So here goes… My favorite bread is typically one w/ a substantially crispy crust and made w/ whole grains. I consume bread on a daily basis. Variety is the spice of life, so some days I’ll eat homemade bread if I have it on hand, other days I’ll eat store bought pita or some other type of bread such as pugliese. I try to bake my own bread every week if I have time, and bake enough to share a loaf w/ friends. One of my favorite ways to eat bread is toasted then topped w/ creamy peanut butter and preserves loaded w/ berries! I’ll usually have this for breakfast 3 or 4 times a week. So there you have it and here’s my bread…

Oat_raisin_bread1_1

Oat_raisin_bread3_1

I was messing around w/ my usual bread recipe and came up w/ this variation.

Here’s the recipe…

Ingredients:

1/2 cup oven toasted oats (I use the kind from Trader Joe’s) 

1/4 cup raisins   

2 cups whole wheat flour 

2 cups all purpose flour

2 tablespoons unsalted butter

1 teaspoon honey

1/4 cup olive oil

1/4 cup  plus 1  1/4 cups warm water

1 rounded tablespoon yeast

2 teaspoons salt

Cornmeal for dusting work surface

Procedure:

1) Mix 1 rounded tablespoon of yeast and ¼ cup warm water

in a large mixing bowl, add 1 teaspoon honey then let stand

for 3 to 4 minutes.


2) Then add to bowl: ¼ cup olive oil and ¼ stick melted butter, 1 ¼ cups warm water, 2 teaspoons salt (make sure salt is dissolved before adding flour).


3) In a separate bowl mix 3 ½ cups flour (2 cups whole wheat, 1 ½ all purpose) and 1/2 cup oats and 1/4 cup raisins, then add to yeast mixture – mix in up to ½ cup more all purpose flour if dough is too moist.


4) Knead dough thoroughly, form it into a ball

and return it to the bowl (dust bottom of bowl w/ flour first),

dust top w/ flour, cover bowl w/ plastic and moist towel

and let dough rise for 1 hour (in a warm spot in your kitchen).


5) Split dough ball in half, split each ball into thirds and roll out into strands long enough to braid, then braid.


6) Place on corn meal dusted surface, dust tops w/ flour, cover w/ plastic bag and let rise for ½ hour.


7) Meanwhile, preheat oven and pizza stone to 425 degrees.


8) Place loaves on stone and pour 2 ounces of water onto bottom of oven to delay crust formation so the bread can expand rapidly and evenly.


9) Turn bread after 20 minutes for even baking, reduce temperature to 350 degrees and bake for another 13 to 15 minutes.


10) Remove from oven and let cool on pie rack.


Share a loaf w/ your friends, or if you really like it, hoard it all for yourself!!

Enjoy your weekend…

Bruno

Sugar High Friday #23

Hello to my fellow food bloggers and thanks to Alanna at A Veggie Venture for hosting this edition of Sugar High Friday.
In keeping w/ the theme, my entry has a surprise inside… it may be hard to see in the picture, but the surprise’s flavor definitely comes through when you bite into this dessert!
La Galette des Rois (also known as King’s Cake)Traditionally, this cake is served on January 6th to celebrate the Epiphany. It is baked w/ a bean or some other favor inside and whoever finds this surprise is crowned king or queen for the day! My galette was baked without a bean inside for no reason other than I just didn’t feel like it… no queens or kings will be running around here today, just people on a sugar high!!

Galette1

Galette2

Galette3_3


** recipe courtesy of my French friend, Herve’

Ingredients:

1/4 cup sliced raw almonds
1/4 cup almond paste
1/4 cup sugar
3 tablespoons unsalted butter, softened
pinch of salt
2 eggs
1/4 teaspoon vanilla
1/4 teaspoon almond extract
2 tablespoons flour
1 package frozen puff pastry sheets, thawed
glaze (1 part water, 2 parts sugar)

Procedure: 

1) Preheat oven to 450 degrees F.
2) Butter a large baking sheet (not dark metal).
3) In a food processor, puree’ the almond paste, almonds, sugar, butter, and pinch of salt until smooth.
4) Add 1 egg, vanilla and almond extract and puree’ until incorporated.

5) Add flour and pulse to mix in.
6) On a lightly floured surface, roll out one sheet of the puff pastry into an 11 1/2 inch square.
7) Invert an 11 inch pie plate onto the square and cut out a round shape by tracing the outline of the plate w/ the tip of a paring knife.
8) Brush the flour from both sides of the round and place it on the buttered baking sheet, then put in refrigerator to chill.
9) Repeat the process w/ the second square of puff pastry, but leave it on the floured work surface.
10) Beat the remaining egg and brush some of it on top of the second round. Score decoratively all over the top using the tip of a paring knife and make several small slits all the way through the pastry to create steam vents.
11) Remove the first round from the refrigerator and brush some of the egg in a 1 inch border around the edge. Mound the almond cream in the center, spreading slightly.
12) Place the scored round on top and press edges together.
13) Bake the galette in the lower third of the oven for 13 to 15 minutes, until puffed and golden. Remove from oven and brush w/ egg a second time.
14) Return galette to rack in the upper third of oven and bake for an additional 12 to 15 minutes or until the edge is a deep golden brown.
15) While galette is still on the oven rack, brush it w/ the glaze mixture, then transfer to a cooling rack.

16) GET HIGH ON SUGAR!

Enjoy your weekend….

Bruno

Five Things to Eat Before You Go to the Big Kitchen in the Sky

Food_bloggers_guide_to_the_globe
I was tagged by Alanna of A Veggie Venture to participate in this fun assignment that has been making the rounds of food blogs worldwide. The meme was started by Melissa of The Traveler’s Lunchbox. I wonder how many times it has circled the globe by now!! Narrowing my choices to just 5 items was a real challenge, as it seems to have been for most all who have done this before me. Well, after some pondering I came up w/ my list. So without further ado I present my list to you…

1) Marron Glace’  -  I love the way candied chestnuts melt in my mouth and fill it w/ such a wonderfully unique flavor!! It would be doubly good to eat some of these delicacies in Paris at Christmastime!

2) RacletteWhen I traveled to Switzerland in January 2004 to bring my mom’s ashes to her homeland, I spent an evening at the home of one of my cousins. They prepared a wonderful feast consisting of raclette and all the fixin’s. They had this amazing machine that fits an entire half round of that lovely cheese and melts the surface, then the melted goodness is scraped onto your plate… simply awesome!!

3) A Paper Towel and an Apple Core – A funny thing happened  as I was hiking in a redwood forest near Santa Cruz, California on New Years Day 2003… I got lost!! Well it wasn’t very funny at the time, but I get a good laugh every time I tell this story to someone. I ran out of food and was starving, so I dug into my pocket and pulled out the remnants of the apple I had w/ my lunch earlier that day. The apple core was wrapped in a paper towel and it sure looked good at that very moment, so… I ate both of them! Well, believe it or not, this can be a veritable delicacy when you’re lost in a redwood forest w/ nothing else to eat!!

4) A Cup of Hot Chocolate w/ a Big Hunk of Fresh Bread

This was what I was fantasizing about during the cold night that I spent shivering in the redwood forest!

5) My Mom’s Homemade Pizza – My mom’s pizza was, and still is, the best I’ve ever had!! The pizza parties she would have were such a great way to gather some good friends together for an evening of deliciousness!! This has since become a tradition in my home too! Thanks mom…

My turn to tag some people. I tag:
Duane – My co-blogger at Zinfully Delicious
Michelle – My food stylist friend
The Culinary Chase
HomeMadeS
Barbara at winosandfoodies

Later…